When we use a PC for a long time, there’s a tendency to get bored or to make it more personalised. Changing fonts is a great way to do that, especially in Windows 11. You can make it feel more fun and personal by changing the font. But Windows 11 does not have a simple button to do this. You can change it by adjusting some settings and using special tools.
In this article, you will see a step-by-step guide on how to change the font in Windows 11. This way, you can give it a fresh new look.
Also Read: How To Use Android Auto: A Step By Step Guide!
What Things You Need For Changing Fonts In Windows 11?

If you change your font in Windows 11, you can give it a new look. The default font is Segoe UI. If you change it, the text becomes easier to read. It is great for accessibility and personalising. However, you also need to attend to a few things. It means that if you change system fonts, it means editing important settings. It is called Windows Registry. Therefore, always follow the steps closely.
Before you start, make sure you have:
- A Windows 11 computer with admin access (you can install and change settings).
- A backup or restore point. You need this if you mess anything up.
- The name of the font you want to use. (like Arial, Times New Roman).
Create a System Restore Point
Here’s how to do it:
- Press Win + S and type: Create a restore point.
- Click the matching result.
- In the window that pops up, click Create.
- Name it something like “Before Font Change”, then click Create again.
- Wait a few moments until it finishes, then click Close.
Also Read: How To Record Calls On iOS And Android?
Method 1: Using Fonts Windows Registry
The Windows Registry is like the control centre for your computer. Here, you can adjust important settings, such as the font. Follow these steps to change the default font in Windows 11:
Step 1: Opening the Registry Editor
- Press Win + R to open the Run box.
- Type: regedit and press Enter.
- If a pop-up asks for permission, click Yes.
Step 2: Make A Backup
It’s important to make a backup. Let’s see how:
- In Registry Editor, click File > Export.
- Choose the place you want to save the file and click Save.
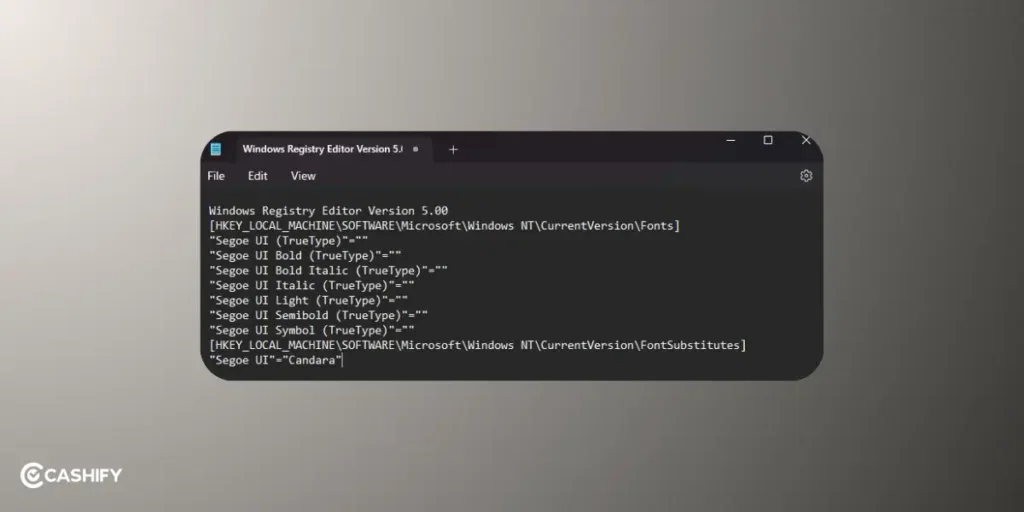
Step 3: Go to the Fonts Section in the Registry
In Registry Editor, navigate to this path:
CopyEdit
HKEY_LOCAL_MACHINE\SOFTWARE\Microsoft\Windows NT\CurrentVersion\Fonts
You’ll see a list of font names and the font files they use (like Segoe UI).
Step 4: Choose Your New Font
Pick a font you like and make sure it’s installed on your PC.
- Press Win + I to open Settings.
- Go to Personalisation > Fonts.
- Browse or search for the font you want. (like Arial or Calibri)
- If it’s not there, download it from a safe place like Google Fonts. Install it by double-clicking the font file and clicking Install.
After this, just restart your PC.
Also Read: How To Get Rid Of Ghost Touch On Android? Follow These Quick Fixes!
How To Change the Font Settings In Registry?
Part 1: Substitute the Default Font
Step 1: Go to this path in the Registry Editor:
CopyEdit
HKEY_LOCAL_MACHINE\SOFTWARE\Microsoft\Windows NT\CurrentVersion\FontSubstitutes
Step 2: In the right panel, right-click > New > String Value.
Name it: MS Shell Dlg
Double-click it and set the value to your chosen font (like Arial).
Step 3: Repeat and create another string value:
Name it: MS Shell Dlg 2
Set its value to the same font.
Part 2: Replace Segoe UI (Optional)
Step 1: Go back to the Fonts folder:
CopyEdit
HKEY_LOCAL_MACHINE\SOFTWARE\Microsoft\Windows NT\CurrentVersion\Fonts
Step 2: Find entries like:
Segoe UI (TrueType), Segoe UI Bold (TrueType), and so on.
Step 3: Double-click each one and replace the font file name with the file name of your new font (like arial.ttf).
Also read: What are Podcasts? How to Listen to Them? Cashify Explains
Method 2: Using Third-Party Tools
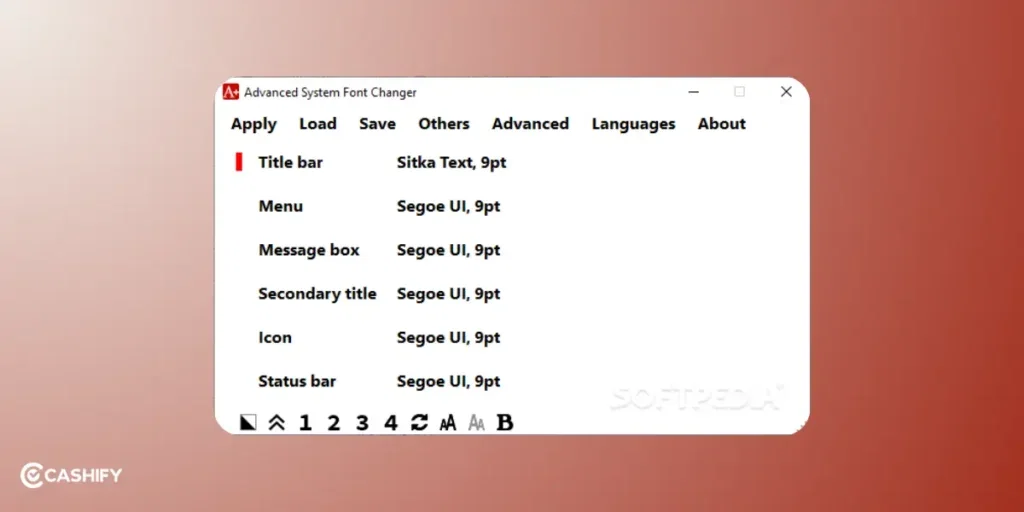
If you prefer not to use the first method, you can also use third-party tools. Third-party tools like Advanced System Font Changer are straightforward and helpful. Let’s check out:
Step 1: Download Font Tool
- Search for Advanced System Font Changer on the internet.
- Make sure you download it from a safe and trusted site.
Step 2: Install and Open the Tool
Let’s see how you can install and open the program:
- Run the file you downloaded.
- Follow the instructions to install it.
- Open the program once it’s installed.
Step 3: Choose New Font
- Inside the tool, look for font settings.
- Choose a font you like. (e.g., Arial, Calibri, or any other).
- You can also change fonts for specific parts. It includes title bars, menus, and message boxes.
- Click Apply or OK to save the changes.
- Restart your computer.
How To Go Back To Default Font In Windows 11?
Let’s check out how:
Option 1: Using the Registry Editor
Let’s check out how to use the Registry Editor:
- Open the Registry Editor (like before).
- Go to this path: HKEY_LOCAL_MACHINE\SOFTWARE\Microsoft\Windows NT\CurrentVersion\FontSubstitutes
- Delete the entries MS Shell Dlg and MS Shell Dlg 2.
- Now go to: HKEY_LOCAL_MACHINE\SOFTWARE\Microsoft\Windows NT\CurrentVersion\Fonts
- Change any modified entries (like Arial.ttf) back to segoeui.ttf (or whatever the original was).
- Restart your computer.
Option 2: Using the Font Tool
- Open Advanced System Font Changer.
- Click the option that says Restore default font settings.
- Apply the changes.
- Restart your computer.
Option 3: Use System Restore
- Press Win + S, search for Create a restore point, and open it.
- Click System Restore.
- Pick the restore point you created earlier.
- Follow the steps to restore your system.
Best Troubleshooting Tips
Now that we know how to change fonts in Windows 11, let’s check out troubleshooting tips:
| Problem | What to Do |
|---|---|
| Font Not Showing | Make sure the font is installed. The font name in the Registry must match exactly, including capital letters. |
| System Problem | Fix it by restoring a backup of the Registry. Open Registry Editor, click File > Import, and choose your backup file. |
| Font Doesn’t Work Well | Some fonts don’t look right in Windows 11. Use common ones like Arial, Calibri, or Times New Roman. |
| Tool Not Working Right | Make sure any third-party tool is updated for Windows 11. Check the tool’s website for updates or a new version. |
In The End
In the end, if you know how to change font in Windows 11, you can easily personalise your system. You can modify the text to match your style accordingly. There are two ways to do it. You can either do it through the Registry Editor or using third-party tools.
Make sure to make a backup so that things don’t get messy. I hope this guide is helpful to you. Feel free to comment below with your thoughts. I would love to hear them!
If you’ve just bought a new phone and don’t know what to do with your old phone, then here’s your answer. Sell old mobile to Cashify and get the best price for it. If you are planning to buy a new phone, check out Cashify’s refurbished mobile phones. You can get your favourite phone at almost half price with six-month warranty, 15 days refund and free delivery.