We know that you love to use your iPhone. One thing that is great about Apple is that “it just works”. This means that everything works the way you want it to without tweaking a lot which is needed on Android devices.
If you are using an iPhone, you would also know that losing one means that you will not only lose the ability to use it but also lose all your important data.
For this reason, you should be well aware of a term named backup. This is basically a way to store all your data in a different place to restore it later.
Read also: Which iPhone Should You Buy Right Now
On an Android device, it is harder to take a full backup of your device. But on an iPhone, Apple has made it extremely easy to backup your device. We recommend everyone to do it as well.
So backing up your iPhone means making a copy of your iMessages, Photos, Videos, ringtones, health data and everything else that you have stored on your device.
Apple gives you an option to backup your iPhone using the iCloud account. This means you can access your backup from any other device where that iCloud account is available. For this, you will have to enable iCloud backup and we will guide you how to do so:
Take iCloud Backup On Your iPhone
Source: iMore
As we have mentioned earlier, Apple does not enable iCloud backups on your iPhone by default and there is a reason for that. Since backups are large in size and iCloud storage is limited (5GB Free), Apple does not want people’s iCloud account to run out of space.
So in order to take a backup of your iPhone and save it to iCloud, you need to first enable it:
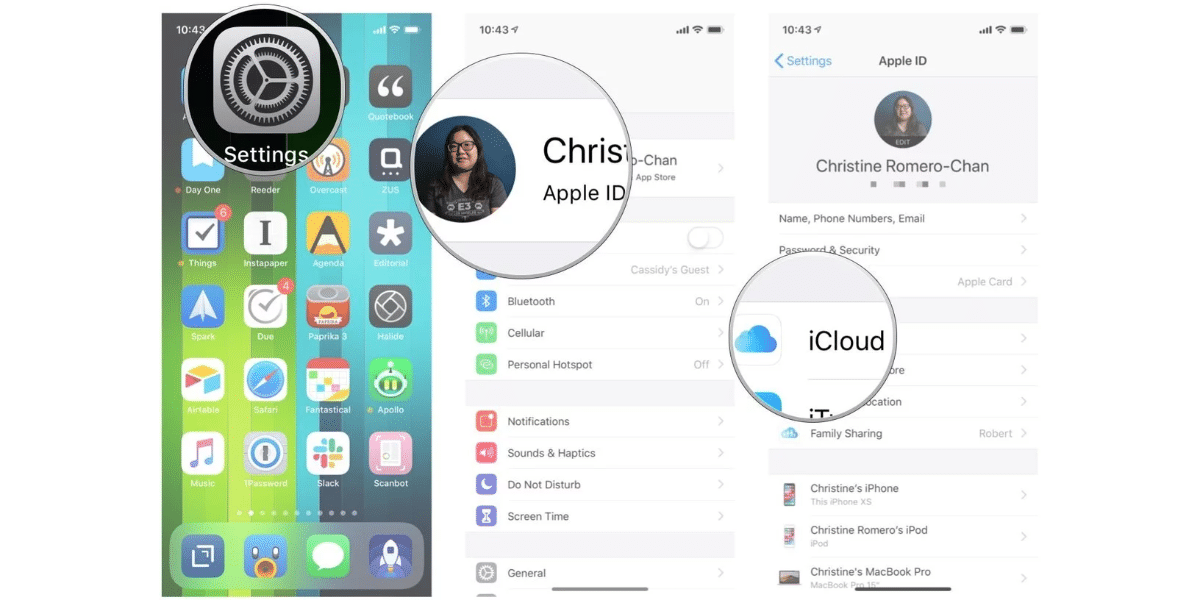
- To do this, go to the Settings app on your iPhone.
- Now, you will see your Apple ID at the top of the Settings app which you need to tap on. Then, you will see iCloud inside the Apple ID. Tap on it as well.
- Inside iCloud, you will see an option for iCloud backup. Enable this option so that your iCloud backups can be enabled and press “Ok” on the next popup.
- Once you have enabled this option, there is nothing else you need to do.
Your iPhone backup will automatically start every 24 hours. It will be saved to your iCloud account on its own.
Read also: Apple iPhone SE2 Everything We Know So Far
However, you need to make sure that the iPhone is connected to a WiFi. Also, you need to have enough battery on your device for the backup to start. If your device is not plugged-in, you need to have more than 50% battery remaining for the backup to start. Else, you can also plug in your iPhone to a charger and the backup will start once the battery reaches 20% while charging.
Note that your first iCloud backup on an iPhone may take time since everything is getting uploaded to the servers. However, the next backups will be much faster since it only has to upload items that are not backed up.
Manually Backup Your iPhone To iCloud
Source: iMore
As we have mentioned earlier, your iPhone will backup automatically to the iCloud account every 24 hours.
However, we know that people might want to back up their iPhones immediately and not wait for the next 24 hours.
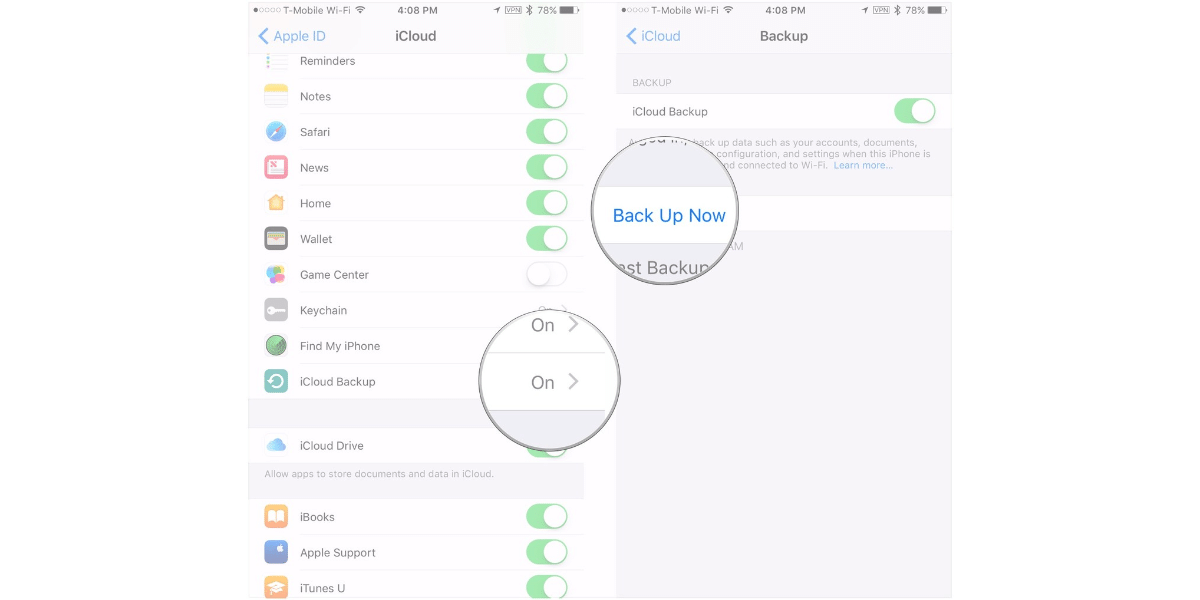
- To do this, go to the Settings app on your iPhone and tap on the iCloud account and go to iCloud settings.
- Now, you will see an option to “Back Up Now”.
- Tap on this option and your iPhone will start backing up at that moment.
The advantage of taking your iPhone backup and storing it in iCloud is that you don’t need to move your data whenever you need to switch devices. Once you enter the iCloud account which already has a backup on a new device, you will automatically be prompted that a backup is available. If you want to restore that backup, your new iPhone will look exactly the same as your old iPhone with everything restored such as your photos, iMessages, phone logs and everything else.
There was also an option to take iPhone backups via the help of a cable and plug it into a PC or a Mac. However, Apple recently announced that they have decided to depreciate iTunes which means you can’t take a backup using iTunes anymore.
Read also: How To Set Up And Start Using Your New iPhone
The only disadvantage of using iCloud backups is that your storage limit might get used up very quickly. Hence you will need to buy additional storage if you need to keep your iPhone backed up all the time.
So we also have another method that is free and does not require you to buy any additional storage. This is via the traditional method of transferring your iPhone data from iPhone to your PC via iTunes.
Take A Backup Of iPhone With iTunes
Source: iMore
Last year, Apple announced that they will be discontinuing iTunes for Mac starting with macOS Catalina which is the latest version of macOS.
This means that people upgrading to the latest version of macOS will lose their iTunes app. And we also know that upgrading to the latest version of macOS is recommended.
Therefore, we can say that Apple has dropped support for iTunes from macOS in general. So you cannot use a Mac to backup your iPhone to the system.
However, you can still use iTunes on any Windows PC which is strange but true. Therefore, you can use the manual method of backing up your iPhone with the help of iTunes with any device that runs on Windows.
For this, you will first have to download iTunes for Windows.
Once the app is downloaded and installed, follow the steps mentioned below to take a backup of your iPhone:
- Connect your iPhone to the PC with the help of your lightning cable.
- Now, your PC and the iTunes app should detect the iPhone that you have connected.
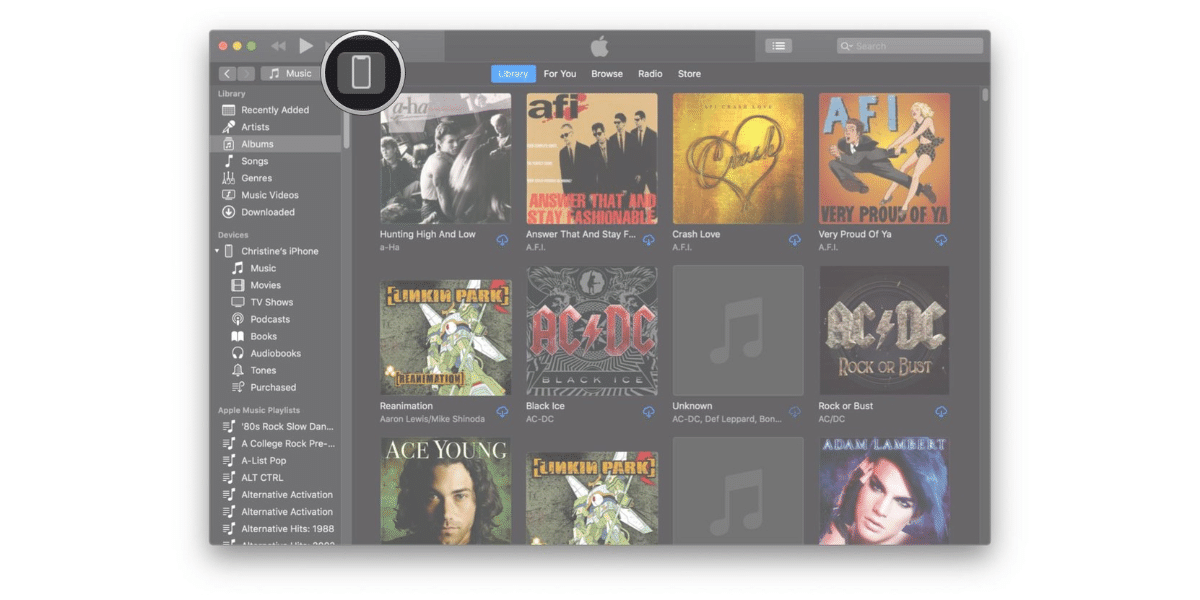
- Click on the iPhone icon seen on top-left inside the iTunes app and go to the Summary section
- Now, you will see a “Manually backup and restore” section. Here, you need to click on “Back Up Now” button which will start backing up your iPhone to the PC
- Once the backup is finished, you need to click on Done at the bottom of the iTunes app.
That’s it, this is how you can take a backup of your iPhone with the help of iCloud account and even iTunes app which is available only on Windows PCs right now.
Read also: Best camera apps for iPhone


