The Government of India has provided us with a 12-digit distinctive number that helps the Government officials identify the citizen of India and also Aadhar card appointment booking services are provided to us. This unique number combination is issued to us by UIDAI (Unique Identification Authority of India), which acts as a record to identify people and is addressed as the Aadhar card.
There are times when you want to get the information updated on your Aadhar card or you want to get yourself a new Aadhar card, for which the UIDAI has recently introduced an online Aadhar card appointment setup wherein you need to go to the UIDAI’s website to get yourself an appointment for Aadhar enrolment.
Information like Name, Sex, Address, Language, and Date of Birth can be easily updated online for your Aadhar card. Still, to update information like Mobile Number, Biometrics, etc., you will need to visit the Aadhar Enrolment Centre.
Read this article to understand how the Aadhar card appointment is made.
Aadhar Card Appointment
To update information on an Aadhar card with the help of the UIDAI Website or the mAadhaar application, you need to do the steps stated below-
Phase 1 – Aadhar Online Appointment
Step No.1:Go to the Appointment Portal.
Step No.2: Choose your resident type
- Indian Resident
- Non-Resident Indian
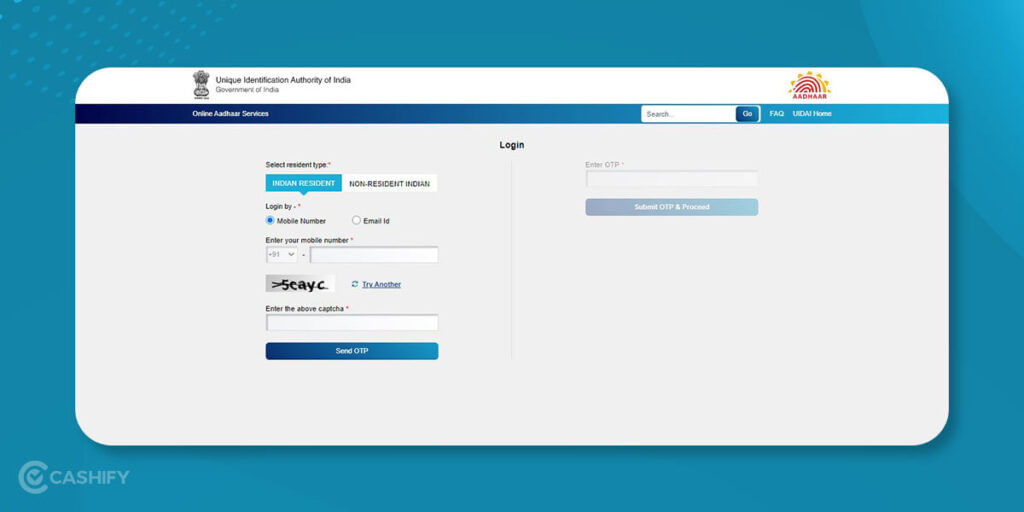
Step No.3: Punch in your registered mobile number or your E-mail ID.
Step No.4: Punch in the Captcha safety code stated on the screen.
Step No.5: Fill in the OTP you must have received on your registered mobile number or E-mail ID.
Step No.6: Move ahead by clicking on Submit OTP & Proceed
Step No.7: A new page will pop up, and you must select the Update Aadhaar option.
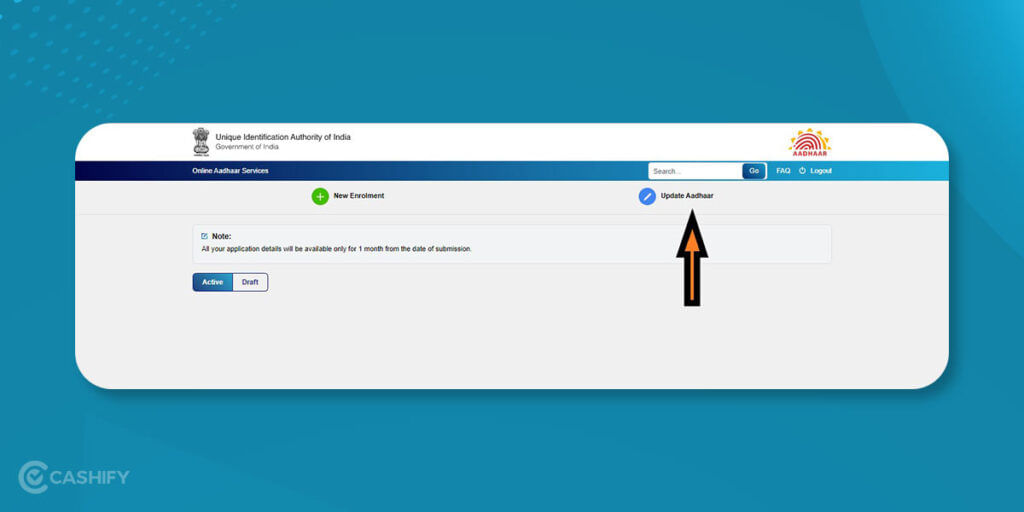
Step No.8: Fill in your Name and Aadhaar Number based on the information on your Aadhaar Card
Step No.9: You will again have to choose your resident type
Step No.10: Select the options you intend to get updated, like your name, gender, DOB, mobile number, email ID, address or biometrics
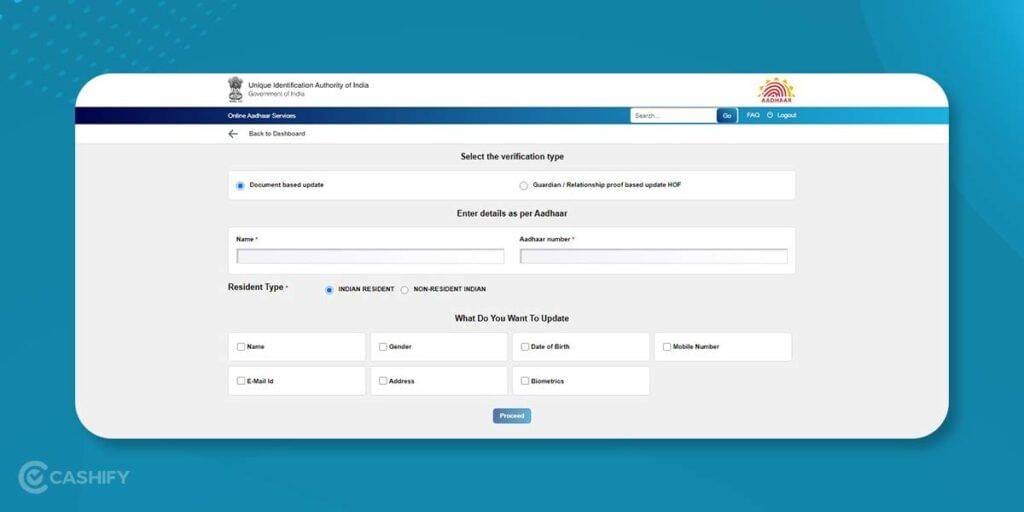
For instance, if you intend to update your Email-ID, select the checkbox before it and click on Proceed.
Step No.11: A new page will pop up wherein you will need to fill in your Email-ID that needs to be updated
Step No.12: Again, punch in the Captcha Code from the box
Step No.13: Choose Send OTP option
Step No.14: Fill in the OTP you get on your Email-ID and click on Verify
Step No.15: Click on Save & Proceed
Step No.16: A new page will occur wherein you need to select the Disclosure option (Disclosure under section 3(2) of THE AADHAAR (TARGETED DELIVERY OF FINANCIAL AND OTHER SUBSIDIES, BENEFITS AND SERVICES) ACT, 2016.
Step No.17: Click on the Submit option
After following the steps above, your application will be advanced to update the Email-ID.
Phase 2 – Aadhar Online Appointment
Step No. 18: After picking the particulars that need to be corrected, you must click on the Book Appointment option.
Step No.19: You will be redirected to a new page to book an appointment
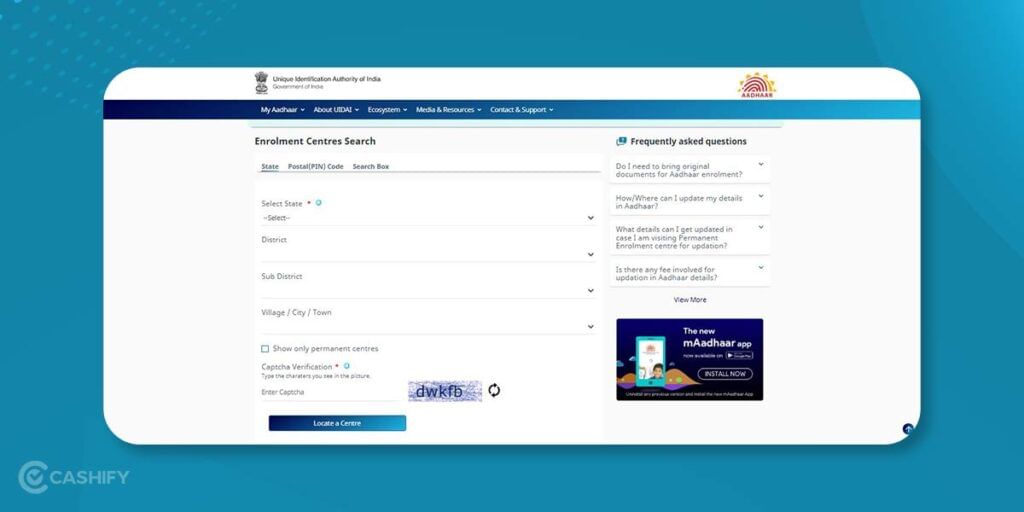
Step No.20: You can search enrolment centre name via centre name, Pincode, state, district, etc. Now, you can select the nearest centre from the given options and click on the Book Appointment option.
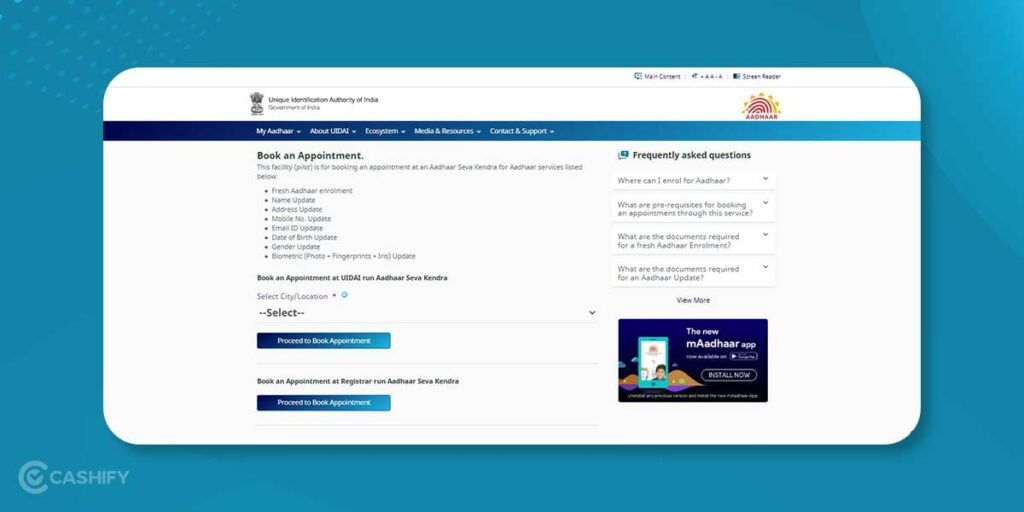
Step No.21: You will be diverted to a fresh page wherein you can choose the time and date for your Aadhaar Update appointment.
Also Read: How To Invest In Metaverse? A Complete Guide
Criteria for the Enrolment of Aadhar
You ought to meet these 3 standards for Aadhaar card enrolment-
- Documents: If the applicant has the requested records, their application form must include records like Proof of Identity or Proof of Address.
- Family’s Head: If you do not provide the unique identification records, the Head of the Family may furnish certain records to show Proof of Relationship.
- Reference: If you do not furnish records like Proof of Identity or Address, the introducer’s reference will be utilised. The introducer is designated by the Registrar having an Aadhaar card.
Also Read: How To Make Money Playing Games?
Documents accepted for Enrolment for Aadhar
| Serial No. | Proof of Identity/Proof of Address |
1. | PAN Card |
2. | Passport |
3. | Debit/Credit Card with a Picture |
4. | School/College ID |
5. | Government ID |
6. | Voter ID |
7. | Arms License |
8. | Driving License |
9. | Ration Card |
10. | Bank Statement/Passbook |
| Serial No. | Proof of Relationship/Proof of Date of Birth |
1. | CGHS/ECHS photo card |
2. | MNREGA Job Card |
3. | Marriage Certificate with Address |
4. | Pensioner Photo Card |
5. | SSC Mark Sheet |
6. | Birth Certificate |
Important Note – Your documents must be submitted in their original form. After the documents have been scanned, they will be returned. There is no need to print photocopies.
Also Read: 9 Best Minecraft Village Seeds For PC
Cancellation of Aadhar Appointment
Follow the steps below to revoke the online appointment-
- Visit the website of Online Appointments.
- Furnish the token ID you received when you booked your Aadhaar appointment initially.
- Fill in the mobile number you utilised when you booked your appointment.
- Select the Cancel Appointment option
- Once you have the appointment cancelled, you will get an SMS mentioning the same.
Also Read: Best of the Flags Chrome Android and PC version to enable
Rescheduling of Aadhar Appointment
Follow the steps below to reschedule the online appointment-
- Visit the website of Online Appointments.
- Furnish the token ID you received when you booked your Aadhaar appointment initially.
- Fill in the mobile number you utilised when you booked your appointment.
- Select the Reschedule Appointment option
- Fill in the information of your desired Enrolment Centre and location, including the date and time of the appointment.
- Fill in the Aadhar verification code.
- Select the Fix Appointment option to confirm your rescheduling
- Once you reschedule the appointment, you will get an SMS mentioning the same.
Also Read: 10 Best Epub Readers for Windows 11 2022
Conclusion
Keeping your Aadhar Card updated with the relevant details is very important for the Government and the people who are allotted these 12-digit unique number cards, so ensure that whatever details the Government has of your Aadhar Card are up to date so as to avoid any potential intricacies in the future.
We hope that our easy step-by-step guide has helped you understand the process of booking an appointment for an Aadhar Card as well as help you know how the Aadhar is updated.
Also Read: 10 Best Deepfake Apps and Websites You Can Try For Fun
Thinking about wanting a new mobile? Cashify offers the service at your doorstep. Thus, sell your phone online or recycle your phone in Cashify.


