There are several approaches to how to take screenshots in Ubuntu. Mostly, it is possible with a few keyboard shortcuts, while there are some alternative methods and tools as well. We are going to discuss some of the most easy ones that will only a few seconds to excute. So, let’s begin, shall we?
Taking screensnaps in Ubuntu is barely any different from Windows. However, there are a few minor differences, which surprisingly make Ubuntu a more convenient platform for doing the task. For example, Ubuntu will automatically save the screenshots in pictures, unlike Windows, which will only copy them to the clipboard. So, if you are using the Ubuntu system currently, this guide is going to be super helpful for you to grab a screen snap.
How To Take Screenshots In Ubuntu Via Keyboard Shortcuts?
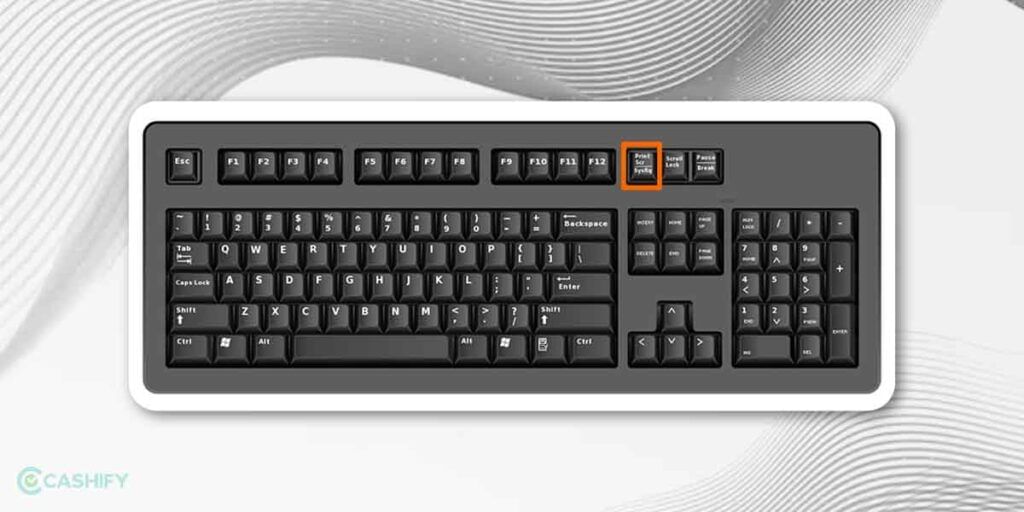
Keyboard shortcuts are a more traditional and simple way to take screenshots; the same applies to Ubuntu. Find the Print Screen key on your general keyboard. It is located on the top row between the [F12] and [Scroll Lock] keys. It might be labelled “Print,” “Print Screen,” or “PrtSc.” Each combination with this button offers different ways of taking screenshots. Read below to know the functionality:
Also Read: On Screen Keyboard Shortcut: How To Enable Or Disable It?
Capturing The Whole Screen Picture:
If you want to grab a screenshot of the whole screen regardless of how many windows and folders are open, hit the Print Screen button on your keyboard. By this, you can capture your entire screen. The screenshot will automatically save in the Pictures folder.
Capture Specific Areas On Screen:
Hold down the Shift key while pressing Print Screen. This activates a crosshair tool. Click on the crosshair and drag it to select the desired area, and then release it to capture the chosen section. This will only capture the area that is covered by the crosshair.
Capture Screenshot Of Single Window:
If you are wondering how to take screenshots in Ubuntu, but for a single window, this works fine. Hold down the Alt key and then press Print Screen. This captures only the active window you’re currently working in.
Copying Screenshots On Clipboard:
If you want to capture an area and paste it directly into another application without wasting time or taps, this is the shortcut you go for. Long press the Ctrl and Shift keys simultaneously, then press Print Screen. This copies the selected area to the desktop’s clipboard. Now, it is ready to be pasted wherever you need it.
Also Read: Facing Spotify Something Went Wrong Error? Here’s A Quick Fix!
How To Take Screenshots In Ubuntu In A Glance!
| Shortcut | Description | Saves To |
|---|---|---|
| Print Screen | Entire Screen | Pictures Folder |
| Shift + Print Screen | Selected Area | Pictures Folder |
| Alt + Print Screen | Active Window | Pictures Folder |
| Ctrl + Shift + Print Screen | Copy Selected Area | Clipboard |
How To Take Screenshots In Ubuntu Via Shortcut Tools
Tools offer more flexibility over keyboard shortcuts about how you want to use or have the screenshot in Ubuntu. Below are a few ways to use them.
The Screenshot Tool
For more control, explore the built-in screenshot tool. Access it through the Activities Overview. This tool offers additional options like:
- Selecting specific windows or areas
- Adding annotations and edits
- Setting capture delays
These are the steps to use the Screenshot Tool on Ubuntu:
- Open the Start menu by clicking it and enter the search term ‘screenshot’.
- Open the screenshot tool.
- Now you have the choice of capturing a shot of the whole screen, or the one of the active window, or an image of a selected area.
- Set a delay if needed and click ‘Take screenshot’.
- Once the screenshot is created, set the storage location, which by default is the Pictures folder.
Also Read: How To Take Screenshot On PC/Laptop?
GIMP (Third Party App)
If you prefer using third-party apps, you can install and use programs like GIMP. It is an advanced image editing tool that also offers features for taking and editing screenshots. It allows you to save in various image formats like PNG, JPEG, or even layered PSD for further editing. However, it is not highly recommended due to safety reasons. Proceed if you are confident about the legitimacy of the application and source. follow these steps to know how to take screenshots in Ubuntu via GIMP.
- Open GIMP and Go to “File” in the menu.
- Select “Create” from the dropdown menu.
- Choose “Screenshot” from the submenu.
- A new window will open with options to capture the whole screen, a single window, or a specific part.
- Choose the desired capture method and click the “Snap” button to start capturing.
- If you selected “Specific Region”, you need to click once and then drag up to the area the area you want to capture.
- After capturing, the screenshot will open in GIMP for further editing.
Terminal Commands (Advanced For Tech Geeks)
If you wish to take a command-line approach, Ubuntu offers terminal commands for screenshots as well. You can explore the terminal options for a more technical approach.
To access the terminal command in your Ubuntu version, you can use the Keyboard Shortcut: Ctrl + Alt + T. Now here are a few examples of how you can use the Terminal commands for screenshots.
| Functionality | Command | Description |
|---|---|---|
| Entire Screen (PNG) | gnome-screenshot -f screenshot.png | Captures the entire screen and saves it as “screenshot.png” in the current directory |
| Specific Area | gnome-screenshot -a | Captures a user-selected area after clicking and dragging the mouse. |
| Entire Screen (Clipboard) | gnome-screenshot -c | Captures the entire screen and copies it to the clipboard (not saved as a file). |
| Specific Window | `gnome-screenshot -w $(xdotool search –name “WindowName” head -1)` | replace -w with your Window ID |
| Delayed Screenshot | gnome-screenshot -d 5 | Captures the entire screen after a delay of 5 seconds |
Use any of these commands, the screenshots will be saved as usual in the Pictures Folder.
How To Take Screenshots In Ubuntu: Final Takeaway
Above, we have discussed a ton of solutions for how to take screenshots in Ubuntu. You can apply any of the methods according to your needs and remember the others. They are not even that complicated to begin with and only take few seconds unless you are going for the technical approach. So, capture what you need, explore the options, and share your knowledge!
Also Read: 15+ Most Useful Mac Keyboard Shortcuts To Help You Work Faster
Buying refurbished mobile phones was never this easy. Sell your old phone and get exclusive offers & discounts on refurbished mobiles. Every refurbished phone is put through 32-point quality checks to ensure like-new standards and comes with a six-month warranty and 15-day refund. Buy refurbished phone easily on no-cost EMI today!