We live in a world where information and data are the two most prized possessions. Want to know how to password protect any file or folder and protect this precious data of yours? It is actually easier than it sounds, and doing so on Windows 11 is not so different from Windows 10. So, if you are familiar with password protecting your files on Windows 10, you will be treading on familiar grounds here. Without any further ado, let’s dive right in!
Also read: How To Use Android Apps On Windows 11: Step-By-Step Guide
Why Password Protect Files & Folders?
Before diving into how to password protect any file and folder on Windows 11, it is crucial to first understand why you would want to do so in the first place. The list of benefits you get from doing so is endless. However, let us consider the key points:
- You get rock-solid security for sensitive work files
- Say goodbye to worrying about losing your data accidentally at the hands of someone else
- You can send these protected files to anyone you trust with the password to open them
In the contemporary world, where digital privacy and security are always at stake, password protecting your files is a significant step forward.
Also read: Attention Windows Users! Here’s How To Update Windows 10 The Easiest Way
Password Protect Files & Folders On Windows 11 – The Organic Way
If you do not want to install third-party apps to password protect your files and folders on Windows 11, there’s good news for you. You do not have to. Windows comes with an in-built feature of password protecting your files. You will know how to password protect any file or folder on a Windows 11-running system in just a few clicks. It is super easy and straightforward. Here’s what you need to do:
How to password protect any file on Windows 11?

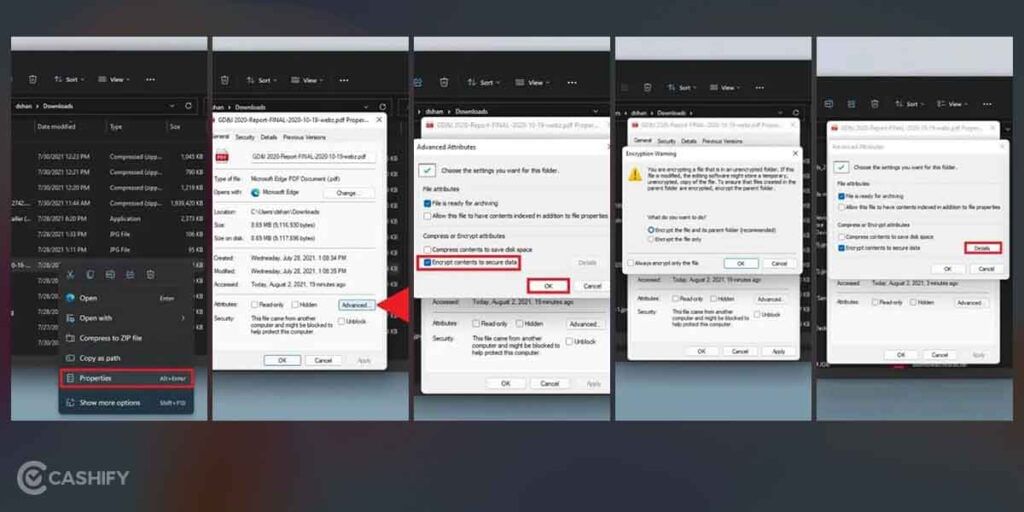
Step 1: First and foremost, open Windows File Explorer on your Windows 11 laptop or desktop.
Step 2: Now, navigate to the file or folder you want to secure with password protection.
Step 3: Once you find the file or folder, right-click on it.
Step 4: Further, upon right-clicking it, you will see an option called Properties. Click on it.
Also read: How To Rotate The Screen In Windows 10: Flip Screen’s Orientation
Step 5: Here, under the General tab, you will see an Attributes section. Click on the Advanced sub-section here.
Step 6: Now, you will see a Compress or Encrypt attributes section. Here, check the Encrypt contents to secure the data option.
Step 7: Click on Ok. Then, click on Apply.
How to password protect any folder on Windows 11?
Now that you know how to password protect any file on Windows 11, things only get easier from here. When it comes to folders, you will see and execute the same steps as you did with securing a file. However, there will be one additional step that you need to follow through.
Right after Step 6, you will see these two options:
- Encrypt the file and the parent folder (recommended)
- Encrypt the file only
If you want to password protect a folder, select the first option to encrypt the file and the parent folder. This will secure the entire folder and its contents, making it the most reliable option.
How To Reverse File/Folder Encryption On Windows 11?
If you change your mind and don’t want to password protect your files and folders anymore, you can quickly reverse it. To do so, all you have to do is follow these steps:
Step 1: Right-click on the file or folder you want to un-encrypt.
Step 2: Click Properties > Advanced.
Also read: How To Give Windows 10 A Makeover To Look Like Windows 11
Step 3: Here, just uncheck the Encrypt contents to secure data option and you are gold. Just tap on Ok and Apply after that and the changes will take effect.
Password Protect Files & Folders On Windows 11 – The Third-Party Way
There are multiple third-party applications out there that will answer your how to password protect any file or folder on Windows 11 question. However, we are going with just one such application which we have always trusted.
We are talking about the Easy File Locker application. You can download it here and it is 100 per cent free to use. This application is effortless to use, and we will take you through the entire process step-by-step.
How to password protect any file or folder with Easy File Locker?
Step 1: Go to System > Set Password.
Step 2: Enter a strong password and click on Ok.
Step 3: Now, head over to Files & Folders > Add Folder.
Also read: This Windows 10 How To Record Screen Guide Will Make Life Easy!
Step 4: Then, you will see Path: beside which there will be a three-dot menu. Click on this and choose your file or folder.
Step 5: Underneath, there will be an Accessible checkbox. Uncheck this.
Step 6: Finally, click on Ok.
With that, you have successfully password protected your file or folder using Easy File Locker.
Final Thoughts
If you were wondering how to password protect any file or folder on Windows 11, we hope these methods helped you get your answer efficiently. Additionally, these methods will surely help you stay worry-free about your personal or work files being accessed by anyone else. Besides, it is always a smart move to password protect your files on a shared PC that all your family members have access to.
Also read: New Windows Media Player For Windows 11: A Complete Guide
Do you want to sell your old phone or recycle your old phone? Try Cashify for the best deals and get rewarded instantly!


