

Outdoor photography looks simple until you actually step outside with your DSLR. One minute you’re shooting in bright sunlight, and the next you’re dealing with shade, moving subjects, or a cloudy sky. Knowing the best DSLR camera settings for outdoor photography can help you handle those changes without missing the shot.
You don’t need to memorize dozens of numbers. Start with a few basic settings, see how your test shot looks, and make small changes depending on the scene.
Also Read: 7 Best Budget Camera Lens Under 20000: Top Picks For Every Photographer
Best DSLR Camera Settings For Outdoor Photography
For a bright, sunny day, start with ISO 100, an aperture between f/8 and f/11, and a shutter speed that gives you a properly exposed image. This works particularly well as a starting point for landscapes and general outdoor shots.
Use these as your starting points for the best DSLR camera settings for outdoor photography:
| Setting | Starting Point | When to Use It |
| ISO | 100–200 | Bright daylight |
| Aperture | f/8–f/11 | Landscapes |
| Aperture | f/1.8–f/4 | Portraits |
| Shutter speed | 1/500s or faster | Moving subjects |
| File format | RAW | Editing photos later |
| White balance | Daylight/Cloudy | Consistent colours |
Don’t treat these numbers as rules. If the light changes, your settings need to change with it.
Start With ISO 100 In Bright Sunlight
If you’re shooting outside on a bright day, ISO 100 is usually the first setting to try. Keeping ISO low helps minimize digital noise and lets your DSLR capture cleaner images.
This is especially useful for landscapes, architecture, travel photos, and other subjects that aren’t moving quickly.
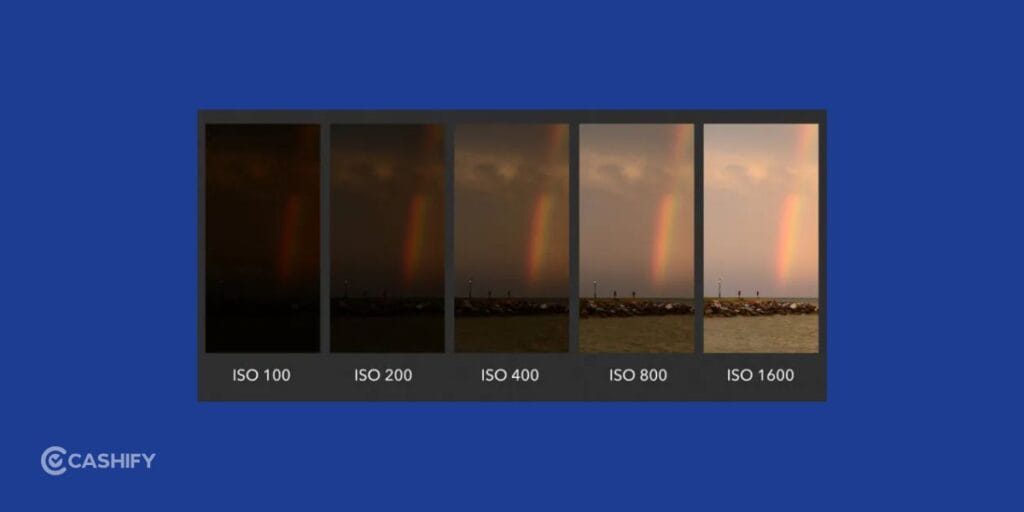
But don’t get stuck on ISO 100. If you’re photographing a moving subject and your shutter speed is too slow, increasing the ISO can help you get a sharper photo.
For the best DSLR camera settings for outdoor photography, think of ISO as the setting you raise when you need more light but don’t want to sacrifice shutter speed or aperture.
Use f/8 To f/11 For Landscapes
A landscape usually has plenty going on across the frame. You might have a tree close to the camera, a building in the middle, and mountains in the distance.
That’s where a smaller aperture can help.
Try f/8 to f/11 when you want more of the scene to appear sharp. You can move towards f/16 if the situation calls for it, although you shouldn’t assume that a higher f-number will always produce a better photo.
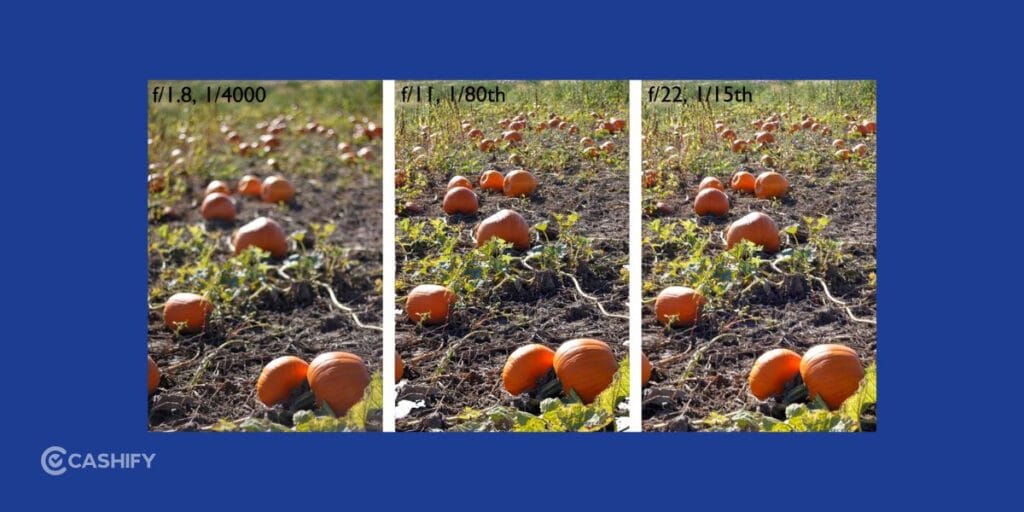
For the best DSLR camera settings for outdoor photography, f/8 or f/11 is a useful starting point for landscapes because it gives you a good balance between depth of field and image quality.
Also pay attention to where you’re focusing. Even the right aperture won’t help much if your focus point is in the wrong place.
Also Read: Best Camera Lens For Portrait Photography: Guide For Beginners
Open Up the Aperture For Portraits
Outdoor portraits are a completely different story.
Instead of trying to keep everything sharp, you may want your subject to stand out from a distracting background. A wider aperture such as f/1.8, f/2.8, or f/4 can help create that separation.
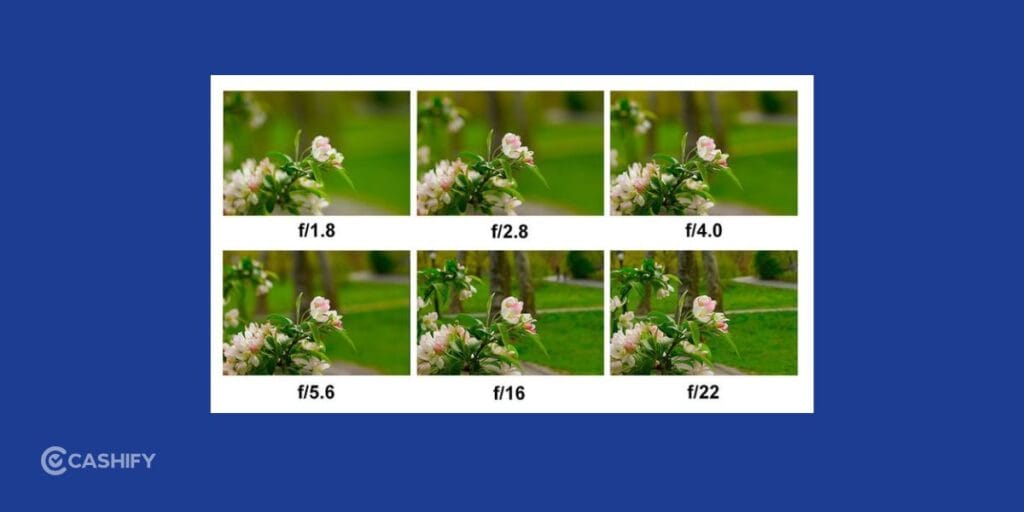
If you’re shooting in bright sunlight at f/1.8, though, your DSLR may need an extremely fast shutter speed to prevent overexposure.
When taking portraits, use this best DSLR camera settings for outdoor photography. Start with a wide aperture, keep ISO low if possible, and use a shutter speed fast enough to keep your subject sharp.
And don’t underestimate the location. Moving your subject into open shade can often give you softer and more flattering light than shooting directly under harsh midday sun.
Increase Shutter Speed For Moving Subjects
This is where many outdoor photos go wrong.
You may have the exposure right, but your subject is still blurry because the shutter speed isn’t fast enough.
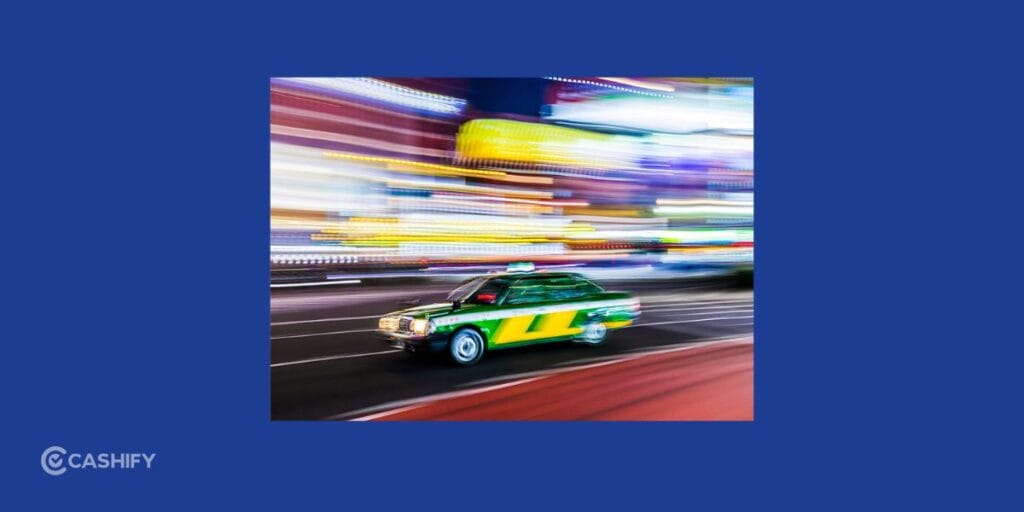
For someone walking or making small movements, around 1/250s to 1/500s can be a useful starting point. For sports, birds, children running, or other fast-moving subjects, you may need 1/1000s or faster.
When working with the best DSLR camera settings for outdoor photography, don’t sacrifice shutter speed just to keep ISO low. A slightly noisy photo is often more useful than a perfectly clean but blurry one.
If the photo becomes too dark after increasing shutter speed, raise the ISO or open the aperture.
Also Read: 4 Best Budget Action Cameras For Travel, Vlogging And Adventures In 2026
What Settings Work On A Cloudy Day?
Cloudy weather doesn’t mean you need to stop shooting. In fact, it can make outdoor portraits easier because the clouds soften harsh sunlight.
The problem is that you’ll have less available light.
You might need to move from ISO 100 to ISO 400 or 800, depending on the conditions. You can also open the aperture or slow down the shutter speed if your subject isn’t moving.
For the best DSLR camera settings for outdoor photography on cloudy days, start by checking your shutter speed. If you’re shooting handheld, don’t let it become so slow that normal hand movement creates blur.
The softer light can actually work in your favour, particularly for portraits.
What White Balance Should You Use Outside?
White balance is easy to ignore until you look at your photos and notice that the colours don’t feel right.
On a sunny day, try the Daylight setting. If you’re shooting under an overcast sky, Cloudy can give your images a slightly warmer appearance.
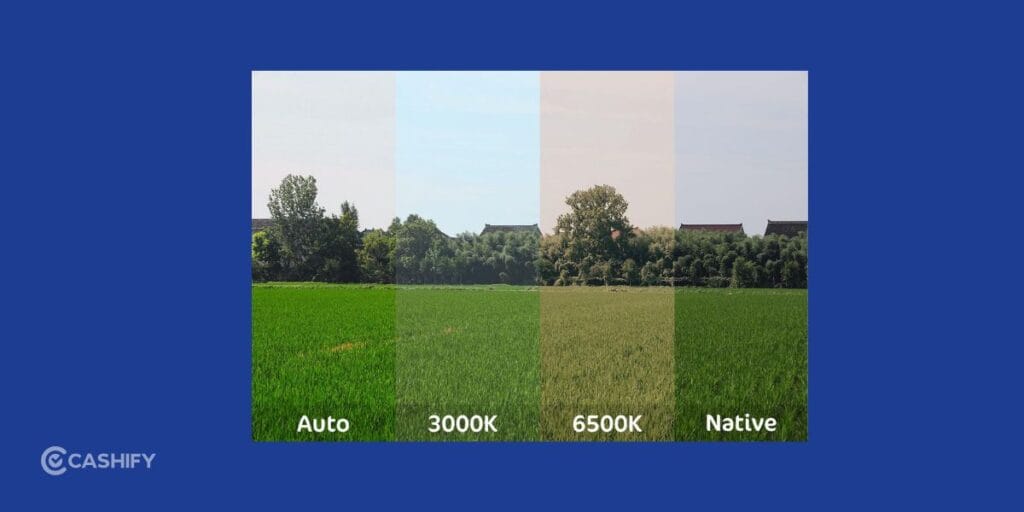
Auto White Balance is also perfectly fine if you’re moving between different lighting conditions and don’t want to keep changing the setting.
When using the best DSLR camera settings for outdoor photography, white balance matters more when you’re shooting a series of photos and want the colours to remain consistent.
If you’re shooting RAW, you also have considerably more flexibility to adjust white balance during editing.
Should You Shoot RAW Outdoors?
If you’re planning to edit your photos, RAW is worth considering.
Outdoor scenes can contain both very bright and very dark areas. Think of a landscape with a bright sky and a darker foreground. A RAW file gives you more information to work with when making exposure, highlight, shadow, and colour adjustments later.
RAW isn’t a setting that will magically make your photos better. It simply gives you more flexibility after you’ve taken them.
It also means larger files and an editing workflow, so JPEG can still make sense if you want photos that are ready to share straight from the camera.
Best Settings For Outdoor Portraits
For portraits, your main goal is usually to make the person stand out.
Try:
- ISO: 100–400
- Aperture: f/1.8–f/4
- Shutter speed: Around 1/200s–1/500s
- White balance: Daylight or Cloudy
- Focus: Single-point or eye/face detection if available
The exact best DSLR camera settings for outdoor photography will depend on how bright it is and how much your subject is moving.
If you’re shooting in direct midday sunlight, look for open shade. You’ll usually get more even light across the face and fewer hard shadows.
Also Read: 13 Best Mobile Phones Under 25000: July 2026 List
Best Settings For Outdoor Landscapes
Landscapes give you more freedom because your subject generally isn’t moving.
Try:
- ISO: 100
- Aperture: f/8–f/11
- Shutter speed: Adjust for exposure
- Focus: Around the appropriate scene distance rather than automatically using the centre
- File format: RAW if you plan to edit
The best DSLR camera settings for outdoor photography for a landscape aren’t only about the camera. Your composition matters just as much.
Look for foreground elements, leading lines, interesting skies, and changes in light. A technically perfect landscape can still feel flat if there’s nothing guiding the viewer through the frame.
Best Settings For Outdoor Action
Action photography needs a different approach because you don’t have much time to react.
Try these best DSLR camera settings for outdoor photography when shooting action shots:
- ISO: 100–800 depending on the light
- Aperture: f/2.8–f/5.6
- Shutter speed: 1/1000s or faster
- Focus: Continuous autofocus
- Drive mode: Continuous shooting
When shooting action, shutter speed should be your priority.
If your subject is moving quickly, start at 1/1000s and adjust from there. If the image is too dark, increase ISO rather than slowing the shutter too much.
Continuous autofocus can also help your camera keep up with a moving subject.
Outdoor Photography In Harsh Midday Sun
Bright sunlight can actually make photography harder.
You may get very dark shadows, blown-out highlights, and harsh contrast. Instead of immediately changing every camera setting, first look at where the light is coming from.
For the best DSLR camera settings for outdoor photography in harsh sunlight, keep ISO around 100 and use your aperture and shutter speed to control exposure. For portraits, moving your subject into shade can make a bigger difference than changing the camera settings.
If you’re photographing a landscape, try shooting earlier or later in the day when the light is softer. The same location can look completely different when the sun is lower.
A Quick Cheat Sheet
Don’t want to remember all of that while you’re outside? Use this as a starting point:
- Sunny landscape: ISO 100, f/8–f/11, adjust shutter speed for exposure.
- Outdoor portrait: ISO 100–400, f/1.8–f/4, 1/200s–1/500s.
- Sports: ISO 100–800, f/2.8–f/5.6, 1/1000s or faster.
- Cloudy day: ISO 400–800, wider aperture if required, and a shutter speed that prevents camera shake.
- Moving water: Low ISO, narrower aperture, slower shutter speed, and a tripod for longer exposures.
These aren’t magic combinations. Use them as your first settings and adjust after checking the result.
Mistakes That Can Ruin Outdoor Photos
Even with good settings, a few simple mistakes can affect your results.
- Keeping ISO 100 no matter what: If your subject is moving, don’t be afraid to increase ISO to get a faster shutter speed.
- Using f/1.8 for everything: A wide aperture is great for portraits but can leave parts of your subject out of focus.
- Ignoring the background: Look beyond your subject before pressing the shutter. Poles, wires, bright objects, and people can easily distract from the main subject.
- Forgetting the light direction: Changing your position by a few steps can sometimes improve a photo more than changing your camera settings.
- Not checking exposure: Use your histogram when you’re unsure whether you’ve lost detail in bright highlights or dark areas.
Final Thoughts
That’s all about the best DSLR camera settings for outdoor photography. The best outdoor photos usually come from making small decisions before you press the shutter. Check the light, decide what needs to be sharp, then choose your aperture and shutter speed around that goal.
You can start with ISO 100 in bright conditions, f/8–f/11 for landscapes, or a wider aperture for portraits. If your subject is moving, give shutter speed more importance and raise ISO when necessary.
Most importantly, don’t be afraid to change your settings. Outdoor light can shift quickly, and the same settings that work at 10 AM may not work an hour later.
Once you start adjusting your DSLR based on the scene rather than memorizing one perfect setup, you’ll have much more control over the final photo.
Also Read: Vivo X300 FE Vs Samsung Galaxy S26 Camera: The Better Phone?